
Introduction
I have a customer here at Hungary. They wanted from us to do a WebSphere healtcheck on its production environment, and also have a look on its monitoring system to make it more reliable and comfortable. Customer has a Tivoli Monitoring System, but the production WebSphere environment does not have a proper neither ITCAM nor SNMP agent configured for monitoring.
Since the customer is running mainly on WebSphere Application Server version 8.5.0.1 and higher except some servers (for example WebSphere Portal and Business Process Manager which are using WAS 8.0) it was a perfect choice to use the WAS’ new SNMP agent, shipped with the product itself.
To clarify the differences between WebSphere SNMP agent and ITCAM for WebSphere.
- ITCAM for WebSphere: has the capability to monitor in a wider perspective including operating system attributes as well amongs WebSphere metrics.
- WebSphere SNMP Agent: is just another server profile inside the configured node, and provides SNMP interface to the PMI (Performance Monitoring Infrastructure – inside WAS) metrics.
Since customer wants to monitor such basic metrics like CPU usage, uptime, JVM heap size and some pool resources, the SNMP agent seemed a better option for them.
Prerequisites
As I mentioned in the Introduction section, the WebSphere built-in SNMP agent can be used only if you are running WAS version 8.5.0.1 and higher. I have never tried to configure it on previous version. On the other hand, SNMP agent can be used only in ND environment, so standalone servers are out of scope at the moment.
So if you have either standalone servers, or running version prior 8.5, you have only one choice if you want to monitor: ITCAM for WebSphere.
You have to enable PMI for the server which you want to monitor at least Basic level. If you are not sure, you can check it on the admin console by navigating the Monitoring and Tuning > Performance Monitoring Infrastructure (PMI) page and choose the node where your server is. Make sure that checkbox labeled as Enable Performance Monitoring Infrastructure and at least Basic level is set inside the Currently monitored statistic set section.
Supported platforms are:
- z/OS
- IBM i
- Distributed operating systems
Installation and configuration
Well, the configuration is pretty straightforward and described in the product KnowledgeCenter (see resources section), but not as clear as I thought. So let’s walk through together on it and you will read my comments as well. 🙂
Note: I have a demo environment within IBM Hungary’s office, and this playground running on RHEL 6.4 x64 (Santiago) and WAS version is 8.5.5.9 (see below).
Installed Product
––––––––––––––––––––––––––––––––––––––––––––––––––––––––––––––––––––
Name:         IBM WebSphere Application Server Network Deployment
Version:      8.5.5.9 ID ND Build Level cf091608.05
Build Date:   2/25/16
Package:      com.ibm.websphere.ND.v85_8.5.5009.20160225_0435
Architecture: x86–64 (64 bit)
Installed Features:
         IBM 64-bit WebSphere SDK for Java
         WebSphere Application Server Full Profile
         EJBDeploy tool for pre-EJB 3.0 modules
         Embeddable EJB container
         Stand-alone thin clients and resource adapters
Installing the agent
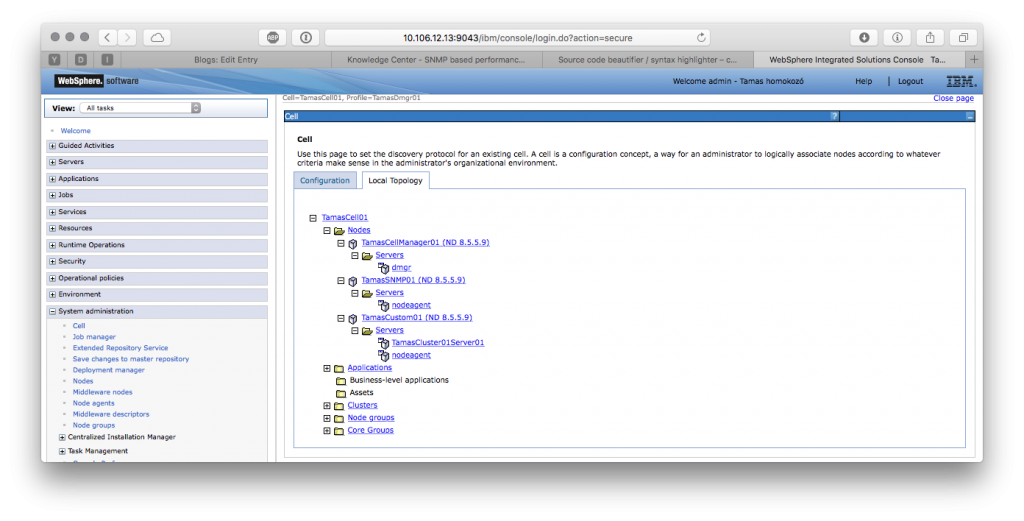
In my environment, I have a dedicated node for the SNMP agents to separate them from the nodes which contains servers/clusters. It is not neccessary, I prefer this way and keep things smooth and clean. My complete topology looks like the following:
Okay, let’s get started.
- Start your Deployment Manager server if it is not running already.
- Navigate the <Dmgr profile root>/bin directory, then execute the following command: ./wsadmin.sh -lang jacl and wait until the wsadmin prompt comes up.
- Locate the SNMP Agent CAR file which can be found on the <WAS binary root>/optionalLibraries directory. In my case this is
/opt/IBM/WebSphere/AppServer/optionalLibraries/IBM/SNMPAgent/config/templates/templateSnmpAgentServer.car - You also need to collect your Cell name and the node name where you want to install the SNMP Agent. You can easily collect thom from the admin console. In my case, the cell name is TamasCell01 and the node name is TamasSNMP01.
- Go back to the wsadmin interface and execute the following command
$AdminTask setVariable {-scope Cell=TamasCell01,Node=TamasSNMP01 -variableName WAS_NODE_NAME -variableValue TamasSNMP01 } - Before we can deploy the agent, you have to define a name for that. In my case I want to monitor my only one server instance, so I named it: SNMPAgent_for_TamasCluster01Server01
- Then execute the following:
$AdminTask importServer {-archive /opt/IBM/WebSphere/AppServer/optionalLibraries/IBM/SNMPAgent/config/templates/templateSnmpAgentServer.car -nodeName TamasSNMP01 -serverName SNMPAgent_for_TamasCluster01Server01 } - Last step is to save the configuration, so execute the following:
$AdminConfig save - Deployment finished, you can close your wsadmin session.
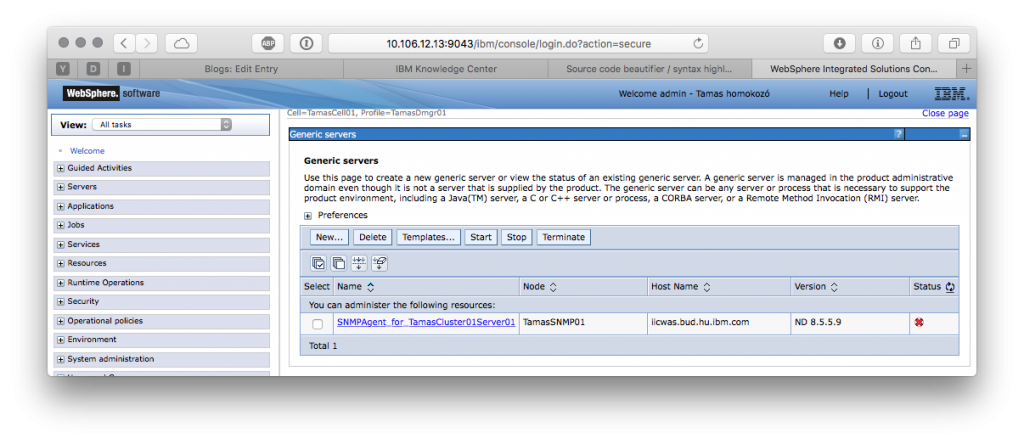
- Check the result on the admin console. To do that, navigate to the Server > Server types > Generic Servers page and check that the configuration has been created with the defined name and inside the configured node.
- DO NOT START THE AGENT YET!
Configuring the agent
Okay, so we have a deployed SNMP agent, now it’s time to configure it. Please note, that an SNMP agent can monitor only one server at a time, so if you have a cluster with 4 servers on two nodes with a deployment manager, and you want to monitor all server instances, you have to install 4 SNMP agent for the servers, 2 SNMP agents for the nodeagents, and 1 SNMP agent for the Deployment Manager.
The agent configuration is little but uncomfortable, because you have to edit 3 XML files under the Deployment Manager config directory. A single SNMP agent has 3 XML files on the following path:
<dmgr profile>/config/cells/<cell name>/nodes/<node name>servers/<server name>/. Before modifying these files, it’s a good idea to create a backup.
agentConfig.xml
The agentConfig file contains all the neccessary configuration for the agent itself. Host name, port, username and password, just the basic stuff. Here is my configuration:
<?xml version="1.0" encoding="UTF-8"?>
<agentConfig agents="WsSNMP" name="WsSNMPAGENT" registryPort="1135">
	<metadata mibs="nh-smi.smi,rfc1213-mib.mib,rmon-mib.mib,snmpv2-tc.mib,tokenring-rmon-mib.mib,websphere-mib.mib,rmon2-mib.mib" mibsFolder="properties/mibs"/>
	<WsSNMP Behaviors="getScalars,getCollection,getControl,getCounter,getData,getTrapDestinations" authMode="MD5" ipAddress="10.106.12.13" jmxConfigFile="jmxConfig.xml" password="******" snmpPort="10162" user="snmpagent" views="V1">
		<V1 communityNames="public" jmacfgFiles="oid.out" trapConfig="trapConfig.xml"/>
		<getScalars class="com.ibm.ws.pmi.snmp.behaviors.GetScalarsBehavior" oid="1.3.6.1.4.1.1977.22.10.1.0"/>
		<getCollection class="com.ibm.ws.pmi.snmp.behaviors.GetCollectionBehavior" oid="1.3.6.1.4.1.1977.22.10.10.1.2"/>
		<getControl class="com.ibm.ws.pmi.snmp.behaviors.GetControlBehavior" oid="1.3.6.1.4.1.1977.22.10.11.1.2"/>
		<getCounter class="com.ibm.ws.pmi.snmp.behaviors.GetCounterBehavior" oid="1.3.6.1.4.1.1977.22.10.12.1.2"/>
		<getData class="com.ibm.ws.pmi.snmp.behaviors.GetDataBehavior" oid="1.3.6.1.4.1.1977.22.10.13.1.1"/>
		<getTrapDestinations class="com.ibm.ws.pmi.snmp.behaviors.TrapDestinationBehavior" oid="1.3.6.1.2.1.16.19.13.1.2"/>
	</WsSNMP>
</agentConfig>
In this file, you have to take care for the following properties:
- Port: The port number to register the bootstrap agent with the Java RMI service registry. This attribute is present in the <agentConfig> tag.
Note 1: Specify a port number higher than 1024 to avoid using reserved ports.
Note 2: you can leave this on default. If you have multiple SNMP agents on the same machine, you should take care not to have a port conflict. - ipAddress: The address of the host on which the IBM WebSphere Snmp Agent runs. The same value should be set in SNMP monitoring software to communicate with the IBM WebSphere Snmp Agent. This attribute is present in the <WsSNMP> tag.
Note: Specify the fully qualified hostname/IP address instead of the default value: localhost. - snmpPort The port number on which the WebSphere Snmp Agent listens for the snmp packets. The same value should be set in SNMP monitoring software to communicate with the IBM WebSphere Snmp Agent. This attribute is present in the <WsSNMP> tag. user The name of the user authorized to connect to the IBM WebSphere Snmp Agent. The same value should be set in SNMP monitoring software to communicate with the IBM WebSphere Snmp Agent. This attribute is present in the <WsSNMP> tag.
Note: ”user” and „password” are the user/password credentials used for the SNMP monitor that is to connect to the SNMP Agent. These credentials are not the WebSphere Application Server credentials used to log in to the administrative console. - authMode The authentication mode used for communicating with the IBM WebSphere Snmp Agent. The same value should be set in SNMP monitoring software to communicate with the IBM WebSphere Snmp Agent. This attribute is present in the <WsSNMP> tag.
Note: do not touch this. Use MD5, do not worry about the plain being, after the configuration completed and synchronized the changes to the node and finally start the agent, it will be masked. - password The password of the authorized user defined in the user attribute. The same value should be set in SNMP monitoring software to communicate with the IBM WebSphere Snmp Agent. This attribute is present in the <WsSNMP> tag.
Note: the password must be at least 8 characters long.
jmxConfig.xml
The jmxConfig file is responsible to configure the connectivity to the desired server instance.
<?xml version="1.0" encoding="UTF-8"?>
<jmxConfig connectorType="SOAP" security="yes" serverTypes="SOAPmbeanServer RMImbeanServer">
	<SOAPmbeanServer address="localhost" connectorSOAPConfig="file:/opt/IBM/WebSphere/AppServer/profiles/TamasCustom01/properties/soap.client.props" keyStore="/opt/IBM/WebSphere/AppServer/profiles/TamasDmgr01/etc/DummyClientKeyFile.jks" ksPassword="*****" password="*****" port="8885" sampleInterval="60" trustStore="/opt/IBM/WebSphere/AppServer/profiles/TamasDmgr01/etc/DummyClientTrustFile.jks" tsPassword="******" user="admin"/>
	<RMImbeanServer address="localhost" connectorRMIConfig="file:${sas.client.props}" password="*****" port="2804" sampleInterval="60" sslRMIConfig="file:${ssl.client.props}" user="admin"/>
	<mbean>
		<collection counterMode="automatic" counters="" expression=".*"/>
	</mbean>
</jmxConfig>
This section is quite well documented in the KnowledgeCenter except two attributes: the trustStore and the keyStore. In normal cases WAS using its own trustStore and keyStore which is in p12 format and can be found inside the config directory of the Deployment Manager. However, the agent cannot use those files because the invalid format. The agent only able to consume JKS stores (Java KeyStore). So to achieve a correct configuration you can simply use the DummyKey and Trust stores inside the Deployment Manager. The correct path is in my case was: <Dmgr profile root>/etc/DummyClient<Trust|Key>File.jks
trapConfig.xml
If you plan for using traps, this is right place for you. Unfortunately, I am not going to cover this section in this blog post.
<?xml version="1.0" encoding="UTF-8"?>
<tns:TrapDestinations xmlns:tns="http://www.ibm.com/schema/WsT/SNMPSchema/TRAPConfig/" xmlns:xsi="http://www.w3.org/2001/XMLSchema-instance" xsi:schemaLocation="http://www.ibm.com/schema/WsT/SNMPSchema/TRAPConfig/TrapConfig.xsd">
	<TrapDestination community="public" index="1" name="${Explorer}" protocol="1" status="1" version="2">
		<HostName/>
		<Port/>
	</TrapDestination>
</tns:TrapDestinations>
You can use my config files as a template in your environment.
Starting the agent
Okay, finally we configured our agent, it’s time to start. But before we can start it, just in case execute a full resynchronize command for the node where the SNMP agent resides. To do that:
- Sign in the WAS admin console and navigate to the System administration > Nodes page. Select the node where your SNMP agent is, and click the Full Resynchronize button. Wait for the success message on the top.
- To start the SNMP agent, navigate the Servers > Server types > Generic servers page.
- Select your agent, then click on the Start button.
- Wait until the red cross at the end of the line changes to a green arrow pointing to the right.
- Check the logs on the filesytem. The SNMP agent has the standard SystemOut.log SystemErr.log log files and a pid file containing the OS process id on the standard logging path: <profile root>/logs/<server name>. You should see something like the following:
IBM WebSphere SNMP Capability IS RUNNING………
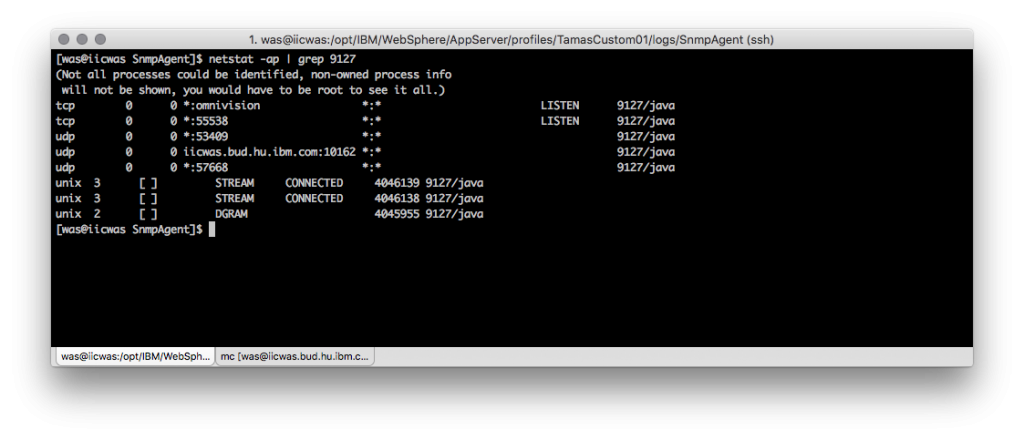
As you can see, my SNMP agent started and connected to my server node running on another profile. It’s a good practice to check the agent using netstat to validate the listening status on the configure snmpPort (10162).
Tracing
In normal circumstances, the agent is not really a talking type guy. Even if he has a headache. So in order to provide the cure, you have to make him talk. A lot. So being serious, enabling the trace is not as easy as a normal WAS server. You have to create a properties file, then you have to modify the JVM generic arguments, nothing special just uncomfortable. Let’s do this.
First of all, you have to create a properties file with the following entries.
traceFileName=stdout com.ibm.ws.pmi.snmp.*=all=enabled com.tivoli.snmp.*=all=enabled
When your file is created, you have to upload it to somewhere on your server. Generally I prefer to store files on the designated directories where meant to be, so I copied the file to my <SNMP node profile>/properties/ directory.
The last step is to configure the SNMP Agent adding some generic JVM arguments to the agent, then restart. To augment the agent with those properties, on the admin console navigate to the Servers > Server types > Generic Servers > Your SNMP server > Process Definition > Java Virtual Machine page and add the following lines to the Generic JVM arguments textarea. Take care for the white spaces and enters. One attribute per line.
-DtraceSettingsFile=/opt/IBM/WebSphere/AppServer/profiles/TamasSNMP01/properties/SNMPTrace.properties
-Djava.util.logging.manager=com.ibm.ws.bootstrap.WsLogManager
-Djava.util.logging.configureByServer=true

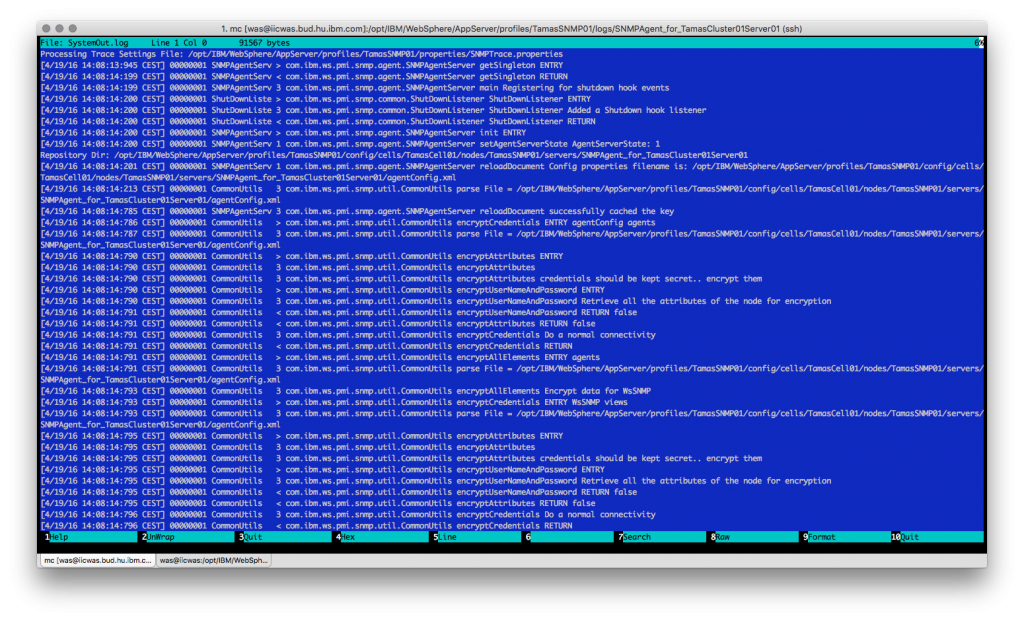
Now you have to Terminate the server and Start when terminated. If your trace configuration is correct, the trace level messages should appear in the SystemOut.log. A trace should look like this:
If debug messages are no longer required in your environment, simply remove the Generic JVM arguments from the configuration and restart your agent.
Testing
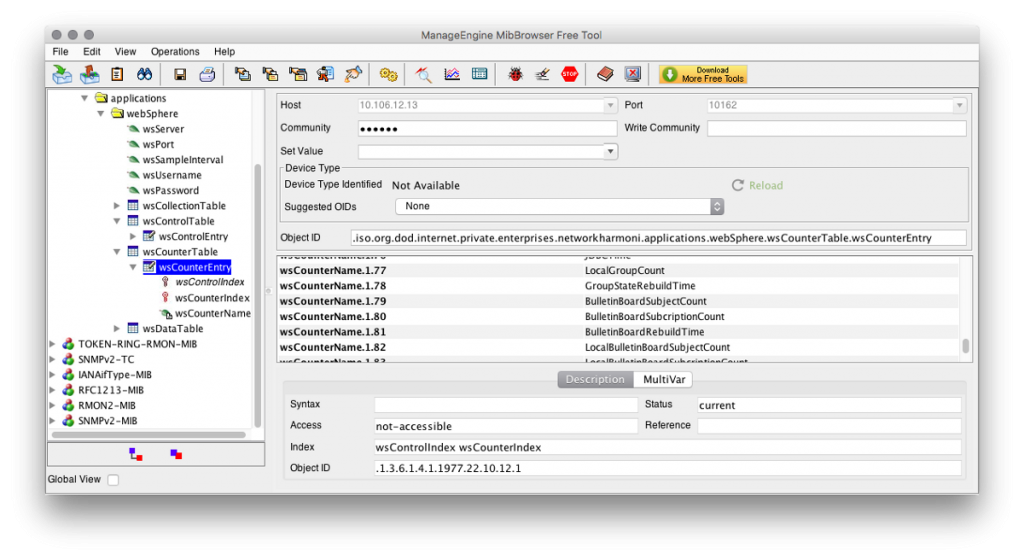
Last but not least, open a monitoring software (for example MIB Explorer or MibBrowser) and try to connect to the SNMP agent. Remember: all the required information for the connection can be found in the agentConfig.xml file (including the username and password as well). So, connect to your SNMP agent and let’s execute an SNMPWALK against it. In MibBrowser you can navigate to the WEBSPHERE-MIB > networkharmoni > applications > webSphere > wsCounterTable > wsCounterEntry > wsCounterName. Right click on the las one and execute an SNMPWALK. Voilá! You received the names of those PMI attributes, which is currently enabled on the monitored server (in my case this is the Basic attribute set).
MIB files
If your monitoring software and/or team ask you to provide the neccessary MIB files, you can download them from the <WAS binary root>/properties/mibs directory. Simply download them and provide to requestor. These are the required files (total 7):
- nh-smi.smi
- rfc1213-mib.mib
- rmon2-mib.mib
- rmon-mib.mib
- snmpv2-tc.mib
- tokenring-rmon-mib.mib
- websphere-mib.mib
Closure
These are just the basics. You can playing aroung to fine tune your monitoring conditions (playing around the MBeans) and trap definitions. I hope this blog entry helped you a little or lot, and saved some time for you. This configuration took me almost a week which is insane (especially if you think how complicated in reality as well).
Happy monitoring!