One of the best thing having an own router that you can customize its configuration for your needs. This customization started with OpenWRT and Gargoyle embedded OS back in the past, but the new devices have more improvements and capacity out of box.
I decided to configure my own USG to be able to block various advertisement sites on a network level. It has many advanteges:
- ads are blocked on a network level, no configuration is required on devices
- all internet traffic going through USG will be protected and filtered
- less amount of data transmitted down and up
- it works not just in browsers, but also in (mobile) apps
- this solution uses blacklisted hosts capability of USG’s Dnsmasq component instead of dumping the site into the hosts file therefore it is more flexible and has better management
Disadvantage? Only one: you have to configure it. 🙂 Let’s get started.
Disclaimer
This guide requires skills to manipulate the embedded Linux operating system in your USG, so please take extra care what you are doing. If something goes wrong, your USG can end in a boot-loop (continous restarting) which can be resolved only with factory reset.
I do not take responsibility for your actions, do it on your own risk!
Getting the script
I found a very good, and working script on Ubiquiti’s forum. This script can manage the list update as well as the internal USG modules management. I will not describe the same knowledge here because it is already written in the source topic, I just want to share my experience.
So the script and its documentation can be found here.
Follow the guide to install it on your USG.
Scheduling update
Utilizing USG’s Debian based operating system is the key component to get your blacklist hosts updated automatically. Once you have installed the script, the next task is to create a scheduled job. This part of the original documentation lacks some information, so I write here what you have to do.
- Open an SSH session on your USG.
- Follow the commands below, I add some comments in parenthesis.
sudo -i (elevate to root)
configure (entering configuration mode)
set system task-scheduler task <task_name> executable path /config/scripts/getBlacklistHosts.sh (creating a scheduled task to run the command)
set system-task-scheduler task <task_name> crontab-spec "30 4 * * *" (setting the time when the task will run 4:30 AM every day)
commit (applying changes)
save (saving changes)
exit (quit from configuration mode)
That’s all. Now if you issue the following command, you will notice that the scheduled task is created in your USG’s configuration:
mca-ctrl -t dump-cfg
And look for the following section:
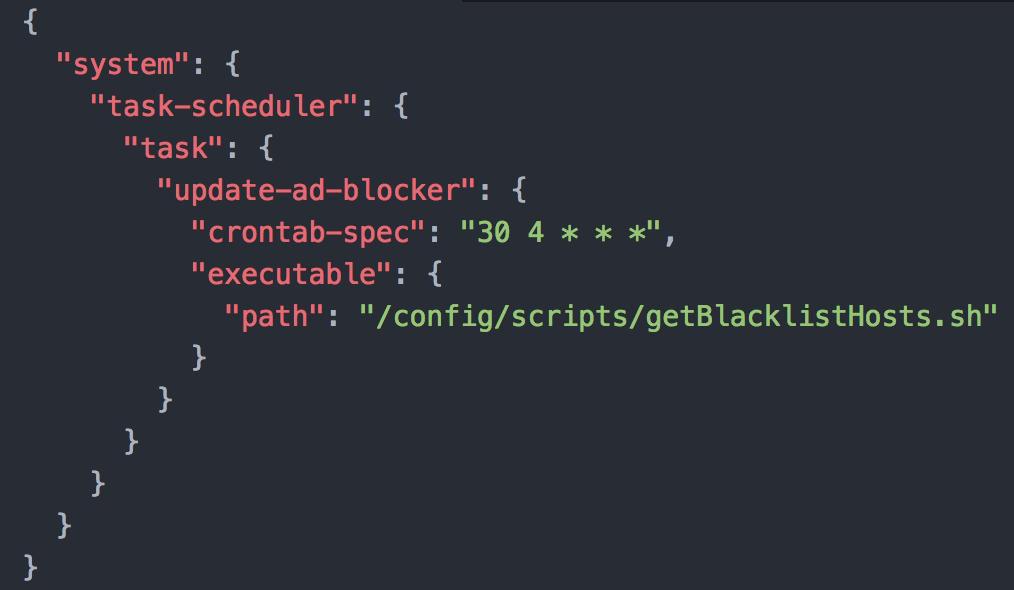
There is a little issue with this configuration. This configuration exists in your USG until a firmware upgrade or re-provision happen. So to make it permanent, you have to add this scheduled task definition to your controller.
So if you never going to update or reprovision your devices (unlikely), you can leave it.
If you want to go on, I suggest to keep reading and in the meantime, remove the newly created scheduled task from your USG, to delete use:
sudo -i
configure
delete system task-scheduler task <task_name>
commit
save
exit
Adding the configuration to your Unifi Controller
I am going to save some time for you, because Unifi is under documented how to create a custom config.gateway.json file to apply customizations in your environment and this file is syntax sensitive which means, if there is any syntax issue in the file, it can break your USG (see disclaimer on top of the post).
Download this file, and copy to your controller’s data directory. If you are running your controller on a supported platform, follow Ubiquiti’s guide to locate your controller’s data directory and place the file there.
If you are running the controller on your Synology NAS (like me), you have to upload the file to:
/volume1/\@appstore/Unifi\ Controller\ 5/data/sites/<site name or default if you have one>
If you are interested in how to configure Unifi Controller on your NAS, you may check out my documentation in this post.
Once you uploaded the file, open your Unifi Controller management interface, and do a force provision on your USG (Devices – USG – Config tab and Force Provision).
If you done everything correctly, checking the configuration on your USG will show the scheduled task applied, and every morning at 4:30 AM the USG will update the blacklist.
You are welcome! 🙂